
Floor vents in an RV are easy to ignore until you notice dust blowing out, strange smells, or weak airflow from your heating or AC system.
Unlike a house, RV ducts collect dirt much faster because you’re constantly bringing in dust from campsites, roads, and outdoor living.
Cleaning them properly improves air quality, airflow, and even system efficiency.
Why RV Floor Vents Get Dirty So Fast
RV ventilation systems sit closer to the ground and deal with:
- Dust and sand from shoes
- Pet hair and debris
- Moisture from outside air
- Road vibrations pushing particles into ducts
Over time, this buildup restricts airflow and can even create odors.
Signs Your Floor Vents Need Cleaning
You don’t need to guess. Here are clear signals:
- Weak airflow from vents
- Dust blowing out when system turns on
- Musty or stale smell
- Visible dirt inside vent openings
- Uneven heating or cooling
If you notice at least two of these, it’s time to clean.
What You’ll Need
Keep it simple:
- Vacuum with narrow nozzle
- Soft brush or old toothbrush
- Microfiber cloth
- Mild cleaner (non-aggressive)
- Screwdriver (for removable vents)
Optional but useful:
- Compressed air
- Flexible cleaning brush
Step-by-Step Cleaning Process
Step 1: Turn Off the System
Always turn off your HVAC system before starting.
This prevents dust from spreading deeper into the ducts.
Step 2: Remove the Vent Covers
Most RV floor vents are easy to remove with a screwdriver.
Take them off carefully and set aside.
Step 3: Clean the Vent Covers
Wash them with:
- Warm water
- Mild soap
Dry completely before reinstalling.
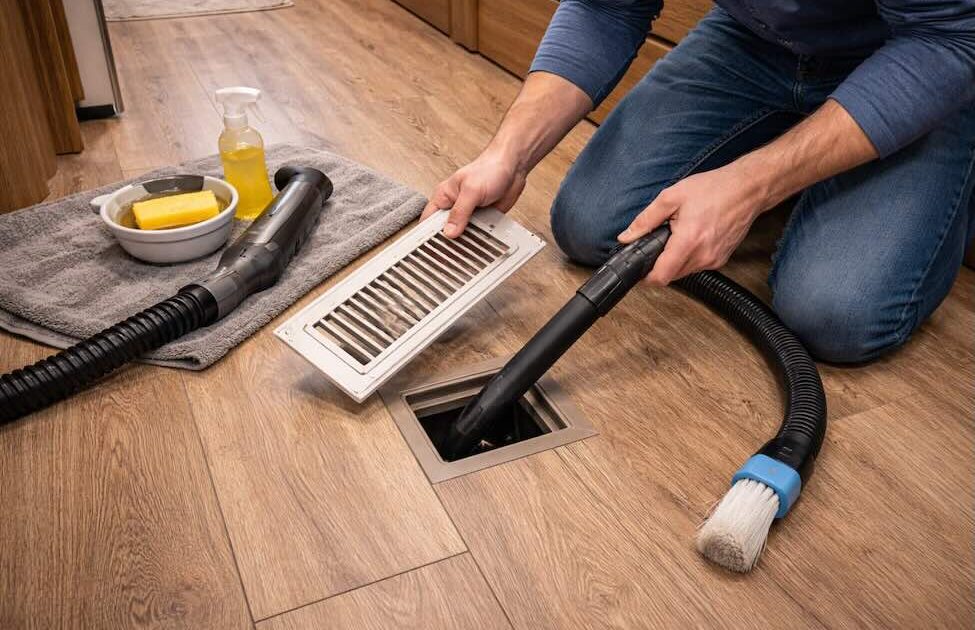
Step 4: Vacuum Inside the Duct
Use a narrow nozzle to reach inside.
Go as deep as possible without forcing anything.
Focus on:
- Dust buildup
- Hair and debris
- Corners and edges
Step 5: Brush Stubborn Dirt
Use a soft brush to loosen debris stuck to duct surfaces.
Then vacuum again.
Step 6: Wipe Around Openings
Clean the edges of the vent opening with a damp cloth.
This prevents dirt from getting pulled back in.
Step 7: Optional Deep Cleaning
If you want better results:
- Use compressed air to blow out deeper dust
- Insert a flexible brush for extended reach
Be careful not to damage duct lining.
Step 8: Reinstall Vents
Make sure everything is dry, then reinstall securely.
Common Mistakes to Avoid
This is where people mess up:
- Cleaning with the system running
- Using too much water inside ducts
- Forcing tools too deep
- Ignoring mold or moisture issues
- Skipping regular maintenance
How Often Should You Clean RV Vents?
It depends on how you use your RV:
- Full-time living: every 1–2 months
- Frequent travel: every 2–3 months
- Occasional trips: 2–3 times per year
If you travel on dusty roads, clean more often.
When Cleaning Is Not Enough
Sometimes vents are not the real problem.
If you still notice:
- Persistent bad smells
- Very weak airflow
- Excess dust returning quickly
You might be dealing with:
- Dirty main ducts
- Failing blower system
- Mold inside ductwork
When to Consider Professional Help?
At Custom Way RV Services, vent cleaning is often part of larger HVAC or interior upgrades.
Typical cases where professional work is needed:
- Deep duct cleaning
- System airflow optimization
- Full HVAC inspection
- Interior rebuild after water damage
Sometimes the issue is not dirt, it’s poor system design or aging components.
Simple Tips to Keep Vents Clean Longer:
A few habits make a big difference:
- Remove shoes inside the RV
- Use entry mats
- Vacuum regularly
- Replace or clean air filters
- Keep windows closed in dusty areas
Cleaning RV floor vents is one of those small tasks that makes a big impact.
Better airflow, cleaner air, and fewer odors all come from simple maintenance that takes less than an hour.
Ignore it, and problems build up fast. Stay on top of it, and your entire RV feels fresher and more comfortable.