
How to Clean Pop Up Camper Canvas?
Pop up camper canvas needs regular cleaning because it is exposed to sun, rain, dust, tree sap, pollen, mildew, campground dirt, and road grime. If the canvas is ignored, it can start to smell, stain, leak, or wear out faster.
The good news is that cleaning pop up camper canvas is not difficult. The key is to use gentle products, avoid harsh chemicals, let the canvas dry completely, and protect the fabric after cleaning.
Why Pop Up Camper Canvas Needs Special Care
Pop up camper canvas is not the same as a regular wall or hard RV panel. It is flexible, folds for travel, and often has waterproof coating or vinyl-coated sections.
That means aggressive cleaning can damage it.
The wrong cleaner can cause:
- Loss of water resistance
- Faded fabric
- Cracked vinyl coating
- Damaged stitching
- Weak seams
- Mold smell coming back
- Leaks during rain
A clean camper canvas should stay flexible, dry, and sealed.
First, Open the Camper Fully
Before cleaning, open the camper completely.
Make sure:
- Roof is fully raised
- Beds are extended
- Canvas is stretched normally
- Windows are zipped or positioned correctly
- Camper is parked on level ground
- You have access to all sides
- Weather is dry enough for the canvas to dry afterward
Do not clean the canvas and then fold it while it is still damp. That is one of the fastest ways to create mildew.
Start With Dry Cleaning
Before using water, remove loose dirt.
Use:
- Soft brush
- Vacuum with brush attachment
- Microfiber cloth
- Small handheld broom
Remove dust, leaves, sand, pollen, spider webs, and dry debris from both inside and outside.
This step matters because rubbing wet dirt into fabric can make stains worse.
Use Mild Soap and Water
For general cleaning, use mild soap mixed with warm water.
Avoid strong household cleaners unless the camper manufacturer specifically allows them.
A basic safe approach:
- Mix mild soap with warm water.
- Test a small hidden area first.
- Use a soft brush or sponge.
- Clean gently in sections.
- Rinse with clean water.
- Let the canvas dry completely.
Do not scrub aggressively. The goal is to clean the surface without damaging the coating or stitching.
Avoid Pressure Washing
Do not use a pressure washer on pop up camper canvas.
High pressure can damage:
- Fabric fibers
- Waterproof coating
- Window seams
- Zippers
- Stitching
- Vinyl panels
- Sealant around edges
A garden hose with gentle water flow is much safer.
How to Remove Mildew From Pop Up Camper Canvas
Mildew is common when the camper was stored wet or not ventilated.
Signs of mildew include:
- Musty smell
- Black or gray spots
- Stains near seams
- Damp odor inside the camper
- Canvas feeling dirty even after light cleaning
For mildew, use a cleaner made for RV canvas, marine canvas, or tent fabric. Test it first in a hidden spot.
Avoid using straight bleach. Bleach can weaken fabric, damage color, and reduce water resistance. Some specialty cleaners may contain mildew-fighting ingredients, but they should be used carefully and rinsed properly.
After cleaning mildew, dry the canvas fully in sun and airflow if possible.
Cleaning Vinyl Windows and Clear Panels
Many pop up campers have clear vinyl window panels.
Clean them gently with a soft cloth and water. Use only products safe for clear vinyl.
Avoid:
- Ammonia glass cleaner
- Abrasive pads
- Harsh solvents
- Dry wiping with dust on the surface
- Rough brushes
Clear vinyl scratches easily. Treat it more carefully than regular glass.
Clean the Zippers and Seams
Zippers and seams collect dirt and can become stiff.
Use a soft brush to clean around zipper tracks. Do not force a dirty or jammed zipper. Clean it first, then move it slowly.
Check seams for:
- Loose stitching
- Small tears
- Leaks
- Stains
- Worn waterproofing
- Separation near corners
Seams are common leak points, especially on older campers.
Let the Canvas Dry Completely
Drying is not optional.
After washing, leave the camper open until the canvas is fully dry inside and outside.
Depending on weather, this can take several hours or more.
Do not fold the camper if the canvas is damp. Even a little trapped moisture can create smell, mildew, and staining during storage.
Reapply Water Protection If Needed
After cleaning, the canvas may need waterproofing treatment.
You may need to re-waterproof if:
- Water no longer beads on the fabric
- Canvas feels dry and absorbent
- You cleaned mildew or stains aggressively
- Camper is older
- Rain starts soaking into the fabric
- Seams show signs of leaking
Use a product made for tent canvas, RV canvas, or marine fabric. Apply it according to the product instructions and allow full drying time.
Do not use random sprays meant for clothing or shoes unless they are safe for your camper fabric.
Check for Tears and Damage
Cleaning is a good time to inspect the canvas.
Look for:
- Small holes
- Tears near corners
- Worn areas around bed slides
- Cracked vinyl
- Loose seams
- Broken zippers
- Water stains
- Roof edge leaks
- Mold behind folds
- Rodent damage
Small tears are easier to repair early. Waiting can turn a small fabric repair into a full canvas replacement.
Clean the Inside Too
The inside of the canvas also needs care.
Use a gentle approach:
- Vacuum dust and debris
- Wipe with mild soap and water
- Clean mildew spots carefully
- Avoid soaking interior fabric
- Let everything dry fully
- Keep airflow moving
If the inside smells bad after cleaning, the problem may be deeper: trapped moisture, old foam, wet flooring, roof leaks, or hidden mildew.
Prevent Future Canvas Problems
Good habits help the canvas last longer.
After every trip:
- Let wet canvas dry before storage
- Clean dirt before it becomes embedded
- Do not store the camper with food inside
- Keep airflow when possible
- Inspect after rain
- Clean bird droppings and tree sap quickly
- Avoid parking under messy trees for long periods
- Check roof and seals regularly
Most canvas problems start with moisture and poor storage.
Common Mistakes to Avoid
Avoid these mistakes when cleaning pop up camper canvas:
- Folding the camper while canvas is wet
- Using pressure washer
- Using harsh bleach solution
- Scrubbing too hard
- Using abrasive pads on vinyl windows
- Ignoring mildew smell
- Cleaning only the outside
- Forgetting seams and zippers
- Skipping waterproofing after deep cleaning
- Storing the camper dirty
Canvas is durable, but it needs gentle care.
When Cleaning Is Not Enough
Sometimes canvas is too damaged to fix with cleaning.
Professional repair may be needed if:
- Canvas has large tears
- Seams are failing
- Vinyl windows are cracked
- Mildew keeps returning
- Water leaks through the fabric
- Zippers are broken
- Canvas has shrunk or stretched badly
- Roof leaks are causing stains
- Flooring is soft from moisture
If mildew comes back quickly, the real issue may be water intrusion, not dirty fabric.
Custom way Can Help With Pop Up Camper Repairs
At Custom way, we help RV and camper owners repair, restore, and upgrade campers for real travel use.
For pop up campers and other RVs, we can help with:
- Canvas condition inspection
- Leak detection
- Roof leak repair
- Door and latch repair
- Flooring replacement
- Soft floor repair
- Electrical upgrades
- Battery and solar systems
- Lighting installation
- Water system repair
- Interior remodeling
- Custom storage solutions
- Full camper renovation projects
Cleaning the canvas is important, but it is also smart to check why the canvas became dirty, wet, stained, or moldy in the first place. Roof leaks, poor seals, damaged corners, and wet flooring should be fixed before they create bigger problems.
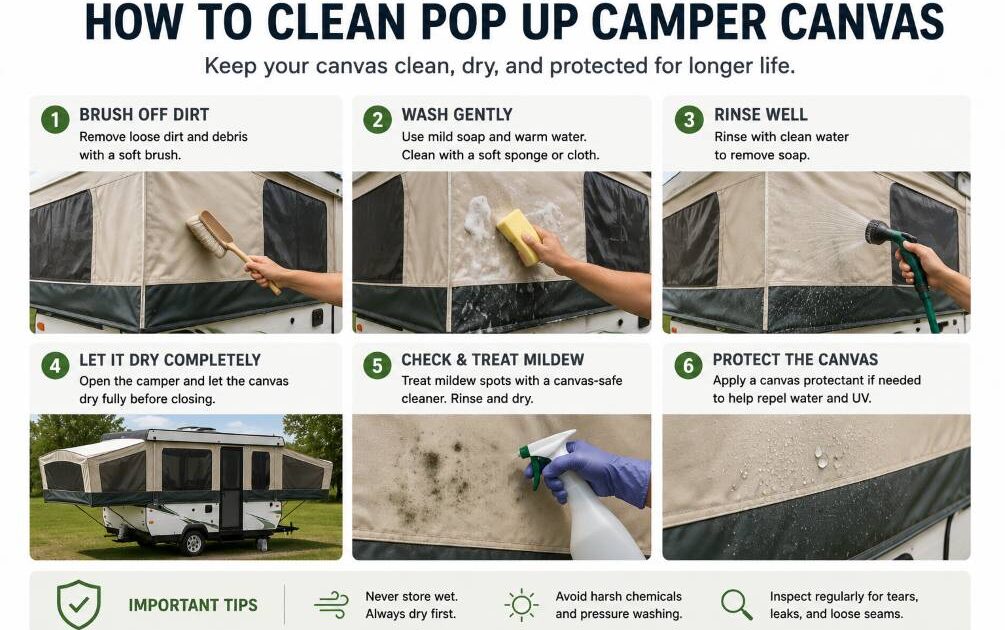
To clean pop up camper canvas, open the camper fully, brush off dry dirt, wash gently with mild soap and water, rinse carefully, treat mildew with a fabric-safe cleaner, and let the canvas dry completely before closing the camper.
Do not pressure wash it. Do not store it wet. Do not use harsh chemicals unless they are approved for your camper material.
A clean, dry, well-maintained canvas keeps your pop up camper more comfortable, better smelling, and ready for the next trip.