
Installing an RV electric tongue jack makes hitching and leveling your travel trailer much easier compared to a manual jack. The job is straightforward, but it must be done correctly to ensure safety, proper wiring, and long-term reliability.
Below is a clear, practical guide that works for most travel trailers.
What Is an RV Electric Tongue Jack?
An electric tongue jack replaces the manual crank jack on the trailer tongue. It lifts and lowers the trailer using 12V battery power and often includes:
-
Push-button controls
-
Built-in LED light
-
Higher lifting capacity
-
Faster operation
What You Will Need:
-
Electric tongue jack (rated for your trailer weight)
-
Socket set or wrench
-
Screwdriver
-
Wire cutters and crimpers
-
Heat-shrink connectors or ring terminals
-
Zip ties
-
Safety gloves
-
Trailer wheel chocks
Step 1. Secure the Trailer
Before starting:
-
Park the trailer on level ground
-
Chock the trailer wheels
-
Disconnect the trailer from the tow vehicle
-
Lower the existing jack slightly to support the tongue
Never work on the tongue without wheel chocks in place.
Step 2. Disconnect Power
-
Disconnect the trailer battery (negative terminal first)
-
This prevents accidental short circuits during wiring
Step 3. Remove the Manual Tongue Jack
-
Support the trailer tongue using the existing jack
-
Remove the mounting bolts (usually 3 bolts)
-
Slide the manual jack straight up and out
-
Clean the mounting surface and bolt holes
Most electric tongue jacks fit the same standard mounting pattern.
Step 4. Install the Electric Tongue Jack
-
Insert the electric jack into the mounting hole
-
Make sure the motor housing faces forward or sideways for clearance
-
Align the bolt holes
-
Install mounting bolts and tighten evenly
Do not overtighten. The jack must sit flat against the frame.
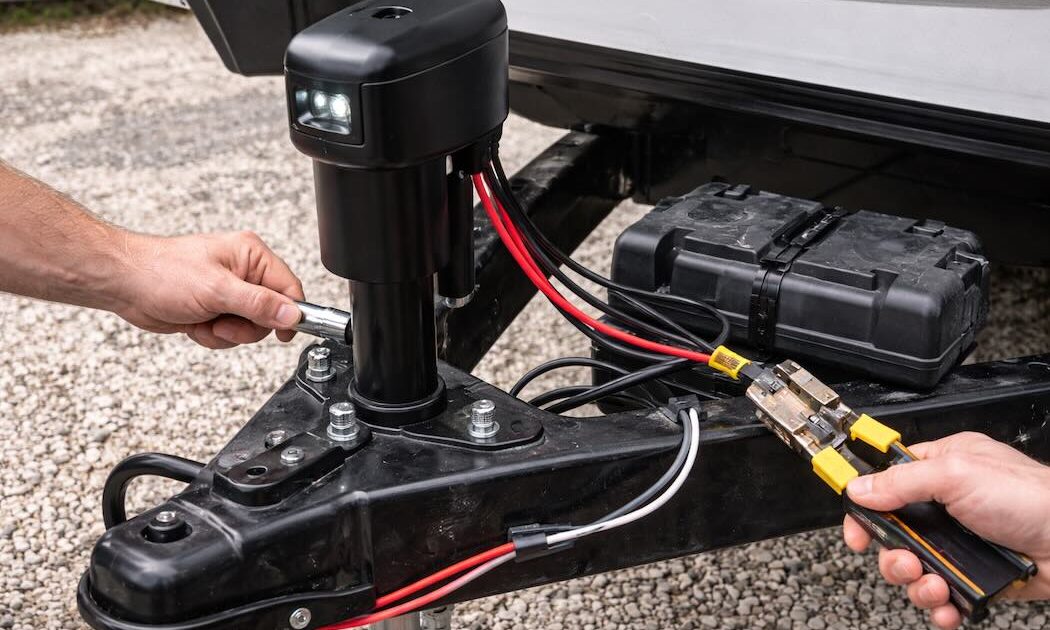
Step 5. Wire the Electric Tongue Jack
Most electric tongue jacks use:
-
Black wire to battery positive
-
White wire to ground (trailer frame or battery negative)
Steps:
-
Route wires away from sharp edges and moving parts
-
Connect the positive wire to the battery using a fused connection if required
-
Connect the ground wire securely to clean metal or battery negative
-
Secure wiring with zip ties
Poor grounding is the most common cause of jack failure.
Step 6. Reconnect Battery and Test
-
Reconnect the trailer battery
-
Press the UP and DOWN buttons
-
Verify smooth operation
-
Check LED light function if equipped
If the jack does not move, recheck wiring polarity and ground connection.
Step 7. Adjust Foot Pad or Wheel
-
Attach the foot plate or caster wheel if included
-
Make sure it clears the ground during travel
-
Test full extension and retraction
Mistakes to Avoid:
-
Installing a jack with insufficient weight rating
-
Forgetting to disconnect the battery
-
Poor ground connection
-
Pinched or exposed wiring
-
Mounting the jack backward causing clearance issues
An electric tongue jack is one of the best upgrades for a travel trailer. When installed correctly, it makes hitching safer, faster, and far more convenient.
We Can Help!
If you want your electric tongue jack installed professionally, you can contact Custom-way.
We understand:
-
Trailer tongue construction
-
Frame mounting points
-
12V wiring systems
-
Safe cable routing and grounding
We can install the jack cleanly and correctly without damaging your trailer.
📞 +1 840-205-7314
✉️ customway.ca@gmail.com