
Adding LED strip lights to your RV awning is one of the best ways to upgrade your outdoor camping experience. Whether you’re lighting up your patio area for evening gatherings or just want better visibility outside your RV, LED lights are energy-efficient, bright, and long-lasting.
In this guide, we’ll show you how to install LED lights on an RV awning, explain the tools you need, and cover helpful tips for choosing the right lights.
Why Install LED Lights on Your RV Awning?
Upgrading your RV’s lighting system comes with several benefits:
-
Energy efficiency – LED lights consume less power than traditional bulbs.
-
Better illumination – Ideal for night-time gatherings or cooking outside.
-
Style and ambiance – Colored LEDs or dimmable lights can create a cozy outdoor setting.
-
Longer lifespan – Modern LEDs can last over 50,000 hours of use.
What You’ll Need
Before you start, gather the following:
-
LED strip lights (designed for outdoor use)
-
12V power source or adapter
-
Silicone adhesive or double-sided mounting tape
-
Zip ties or mounting clips
-
Wire connectors
-
Optional: Remote or dimmer switch
Step-by-Step: How to Install RV Awning LED Lights
1. Measure Your Awning
Decide how much of the awning you want to light. Measure the length and purchase a waterproof LED strip to match.
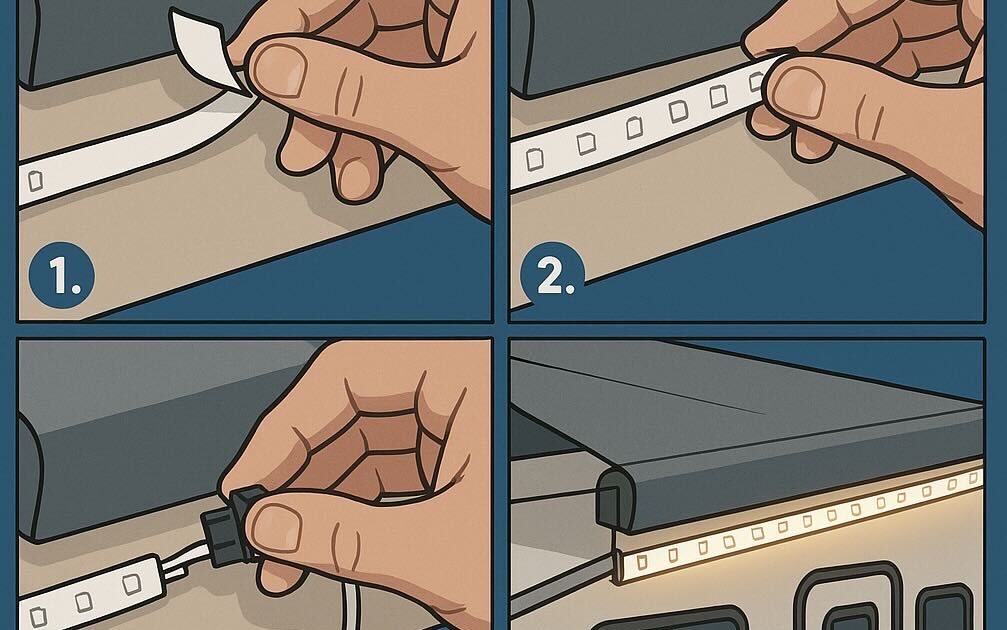
2. Clean the Mounting Surface
Wipe down the area underneath the awning or the rail where you’ll stick the lights. Dirt or moisture can reduce the effectiveness of adhesive strips.
3. Install the LED Strip
Use outdoor-rated adhesive or silicone glue to stick the LED strip along the rail. Alternatively, use zip ties or mounting clips for extra security.
💡 Tip: Position the strip to face outward and slightly downward for maximum light coverage.
4. Connect to Power
You have a few power options:
-
12V Battery: Connect directly to your RV battery if the strip is 12V-compatible.
-
Converter: Plug into an inverter if the strip requires AC power.
-
DC Power Adapter: Plug into an exterior outlet.
5. Secure Wiring
Use zip ties and wire clips to tidy up loose cables and protect connections from weather exposure.
6. Add Switches or Remotes (Optional)
Install a dimmer switch or remote control module if you want to control brightness or colors.
Common Questions
🔌 How to Install LED Lights in RV Interior?
The process is similar — clean surfaces, use adhesive strips, and connect to your RV’s interior 12V system.
🔁 How to Replace RV Lights With LED?
Remove old incandescent bulbs and swap them with LED equivalents. For fluorescent tubes, you may need to bypass the ballast and rewire for LED compatibility.
💡 How Bright Are RV LED Bulbs?
Look for lumens rating. For example:
-
200–300 lumens: mood lighting
-
600+ lumens: general lighting
-
1000+ lumens: task lighting
Installing LED strip lights on your RV awning is a simple upgrade that adds big value. It improves visibility, saves energy, and enhances your outdoor RV living area.
If you’re not confident doing the installation yourself, you can always contact professionals like us at Custom-Way. We offer custom RV lighting and remodeling services in California.
📞 Call us at +1 840-205-7314
🌐 Visit: https://custom-way.com