
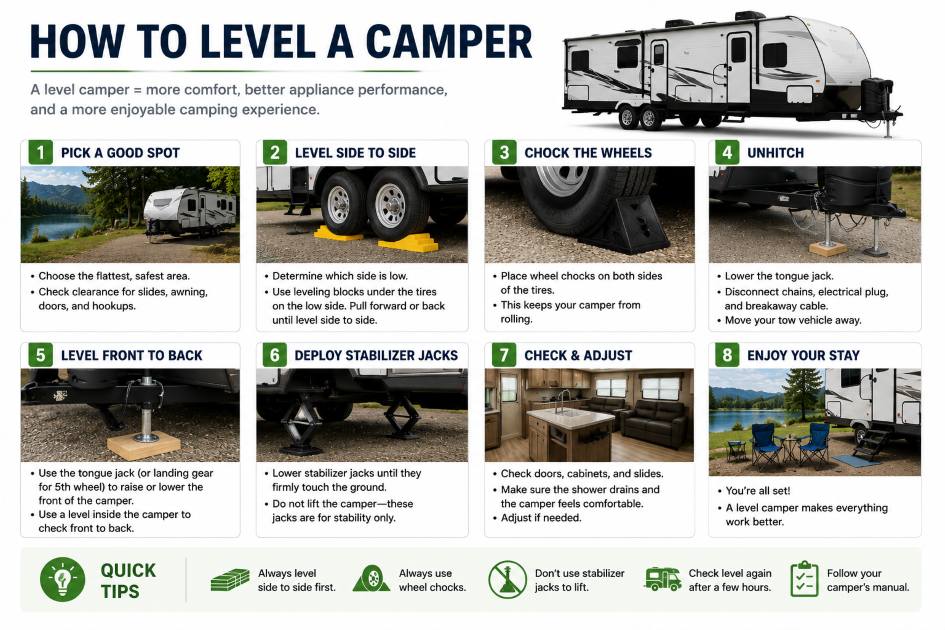
How to Level a Camper
Leveling a camper is one of the first things you should do after parking at a campsite. A level camper feels better inside, helps doors and cabinets work correctly, keeps the bed more comfortable, improves drainage, and helps some RV appliances operate properly.
If your camper is not level, you may notice doors swinging open, water collecting in the shower, the refrigerator working poorly, slide-outs feeling strained, or the whole RV feeling unstable when people walk around.
The process is simple once you understand the order: level side to side first, then front to back, then stabilize.
Why Leveling a Camper Matters
Leveling is not just about comfort. It affects many parts of the camper.
A properly leveled camper helps with:
- Sleeping comfort
- Refrigerator performance
- Shower and sink drainage
- Slide-out operation
- Door and cabinet alignment
- Water tank readings
- Overall stability
- Cooking and countertop use
- Reduced stress on the frame
A camper does not need to be perfect down to a tiny fraction, but it should be close enough that the interior feels normal and appliances can operate safely.
Tools You May Need
For basic camper leveling, you may need:
- Bubble level or digital level
- Leveling blocks
- Wheel chocks
- Tongue jack or landing gear
- Stabilizer jacks
- Drill socket for stabilizers, if compatible
- Gloves
- Flashlight
- Small board or jack pad for soft ground
Many campers also have built-in leveling systems, but even then, it is useful to understand the manual process.
Step 1: Pick the Best Parking Spot
Before you start leveling, choose the flattest part of the campsite or driveway.
Look for:
- Firm ground
- No deep holes
- No sharp rocks under tires
- Enough room for slide-outs
- Enough room for awning
- Safe entry step height
- Good drainage if rain comes
- Clearance from trees and hookups
Do not fight a terrible spot if you can reposition the camper slightly and make the job easier.
Step 2: Level Side to Side First
For travel trailers and most towable campers, side-to-side leveling should be done before unhitching.
Check which side is low. Then place leveling blocks or boards under the tires on the low side.
Slowly pull forward or back onto the blocks until the camper is level side to side.
Do not place leveling blocks under stabilizer jacks to lift the camper side to side. Stabilizer jacks are not designed to carry that kind of load.
Step 3: Chock the Wheels
Once the camper is level side to side, chock the wheels before unhitching.
Use wheel chocks on both sides when possible, especially on sloped ground.
This step matters. A camper can roll if it is not properly chocked, even if the slope looks mild.
Step 4: Unhitch the Camper
After the wheels are chocked, disconnect from the tow vehicle.
Follow your normal unhitching routine:
- Lower the tongue jack
- Release weight distribution bars if used
- Disconnect safety chains
- Disconnect electrical plug
- Disconnect breakaway cable
- Move the tow vehicle away carefully
Keep the area clear while unhitching.
Step 5: Level Front to Back
Use the tongue jack to raise or lower the front of the camper until it is level front to back.
Place your level inside the camper floor, on a countertop, or use a mounted exterior level if it is accurate.
For a fifth wheel, use the landing gear to adjust front-to-back level.
For a motorhome, use leveling blocks or the automatic leveling system depending on the setup.
Step 6: Deploy Stabilizer Jacks Last
After the camper is level, lower the stabilizer jacks.
The key word is stabilizer. These jacks are meant to reduce movement, not lift and level the camper.
Lower them until they make firm contact with the ground or jack pads. Do not crank them so hard that they lift the camper or twist the frame.
Overloading stabilizer jacks can damage the jack, frame, wall structure, or door alignment.
Step 7: Check Doors, Slides, and Interior Feel
After leveling and stabilizing, walk inside and check:
- Entry door operation
- Cabinet doors
- Bathroom door
- Refrigerator door
- Slide-out clearance
- Shower drainage
- Bed comfort
- General movement when walking
If the camper still feels twisted or doors do not work right, recheck the level and stabilizer pressure.
How to Level a Motorhome
Leveling a motorhome is slightly different because it is self-propelled and may have automatic leveling jacks.
Basic process:
- Park in the best available spot.
- Set the parking brake.
- Check the level.
- Use leveling blocks under tires if needed.
- Use the automatic or hydraulic leveling system if equipped.
- Follow the manufacturer’s sequence.
- Avoid lifting wheels off the ground unless the system and manual allow it.
- Check stability before opening slide-outs.
Be especially careful with rear wheels. On many motorhomes, the parking brake works through the rear wheels, so lifting the rear tires off the ground can create a safety risk.
How to Level a Camper Without Blocks
If you do not have leveling blocks, you can sometimes reposition the camper on flatter ground.
But for real camping, blocks are almost always worth carrying.
Avoid using unstable materials like loose bricks, random rocks, weak plastic crates, or narrow boards that can split. The tire needs solid, wide, stable support.
Should You Level Before Opening Slide-Outs?
In most cases, yes. Level the camper first, then operate slide-outs.
Slide-outs are heavy and rely on proper alignment. If the camper is badly off-level or twisted, the slide mechanism may bind, strain, or seal poorly.
Always follow your RV manual, but as a general habit, leveling before slide operation is smart.
Common Leveling Mistakes
Avoid these common mistakes:
- Unhitching before leveling side to side
- Using stabilizer jacks to lift the camper
- Forgetting wheel chocks
- Using weak or unstable blocks
- Opening slide-outs before leveling
- Overextending jacks
- Ignoring soft ground
- Lifting motorhome rear wheels off the ground
- Trusting a bad level reading
- Not checking door and cabinet behavior after setup
Most leveling problems come from rushing the setup.
How Level Is Level Enough?
You do not need laboratory precision. The camper should feel comfortable, doors should behave normally, and appliances should operate safely.
A simple bubble level or digital level is usually enough.
If you can feel yourself leaning while walking, sleeping, showering, or cooking, the camper needs adjustment.
What If the Camper Still Feels Unstable?
If the camper is level but still rocks too much, the issue may be stabilization, not leveling.
Possible solutions include:
- Proper stabilizer jack placement
- Jack pads on soft ground
- Wheel chocks
- X-chocks between tandem wheels
- Checking loose stabilizer hardware
- Inspecting suspension
- Checking frame or jack mounting points
If a stabilizer jack is bent, loose, or pulling away from the frame, it should be repaired before it gets worse.
Custom way Can Help With Camper Leveling and Stabilization Issues
At Custom way, we help RV owners with leveling, stabilizer, suspension, slide-out, frame, and interior problems that affect comfort and safety.
We can help with:
- Stabilizer jack repair
- Leveling system inspection
- Electric and hydraulic jack troubleshooting
- Slide-out alignment issues
- Entry door alignment problems
- Suspension inspection
- Soft floor repair
- Frame and mounting point checks
- Electrical repairs for power jacks
- Full camper and motorhome service
- Flooring, cabinets, roof, plumbing, doors, and many other RV services
If your camper is hard to level, feels unstable, or doors and slides behave strangely after setup, the problem may be more than campsite slope. It may involve jacks, frame flex, suspension, or worn hardware.
To level a camper, start by parking on the flattest safe spot. Level side to side first using blocks under the low-side tires. Chock the wheels. Unhitch. Then level front to back using the tongue jack or landing gear. After the camper is level, lower the stabilizer jacks to reduce movement.
Do not use stabilizer jacks as lifting jacks. Do not skip wheel chocks. Do not open slide-outs on a badly unlevel camper.
A properly leveled camper feels better, works better, and protects the systems that make RV travel comfortable.