How to Repair the Side of a Motorhome
Damage on the side of a motorhome should not be ignored. What looks like a small crack, dent, soft spot, loose trim, or open seam can quickly turn into water damage, delamination, mold, rotten wall structure, damaged flooring, or electrical problems inside the RV.
The side wall of a motorhome is not just a decorative panel. It protects the insulation, framing, interior wall panels, wiring, cabinets, windows, doors, and flooring. If the exterior side is damaged, the safest decision is to have it inspected before the problem spreads.
Custom way can help with motorhome side repair, fiberglass damage, exterior panel problems, leak detection, delamination concerns, trim resealing, interior water damage, flooring, cabinets, electrical work, and many other RV services.
Common Types of Motorhome Side Damage
Motorhome side damage can happen from parking mistakes, tree branches, road debris, storms, water leaks, old sealant, sun exposure, vibration, or previous poor repairs.
Common problems include:
- Fiberglass cracks
- Scratches and chips
- Dents in exterior panels
- Holes from impact damage
- Loose trim
- Damaged compartment doors
- Cracks around windows
- Open seams
- Water stains
- Soft wall areas
- Bubbles in the sidewall
- Delamination
- Damaged decals or paint
- Damage around entry doors or slide-outs
Some of these issues are cosmetic. Others are structural. The problem is that it is not always easy to tell from the outside.
That is why professional inspection matters.
First Step: Do Not Cover the Damage Too Fast
Many RV owners make the same mistake. They see a crack or hole and immediately cover it with tape, silicone, filler, or a random sealant.
That may stop water for a short time, but it can also hide the real problem.
Before repairing the side of a motorhome, you need to understand:
- How deep the damage is
- Whether water has entered the wall
- Whether the sidewall is delaminating
- Whether the frame or backing material is soft
- Whether nearby trim or windows are leaking
- Whether the damage is only cosmetic or structural
A quick patch may look acceptable from a distance, but if moisture is trapped inside the wall, the damage can continue spreading.
Fiberglass Sidewall Repair
Many modern motorhomes have fiberglass exterior sidewalls. Fiberglass looks clean and smooth, but it can crack, chip, or separate after impact or water intrusion.
Small fiberglass damage may involve:
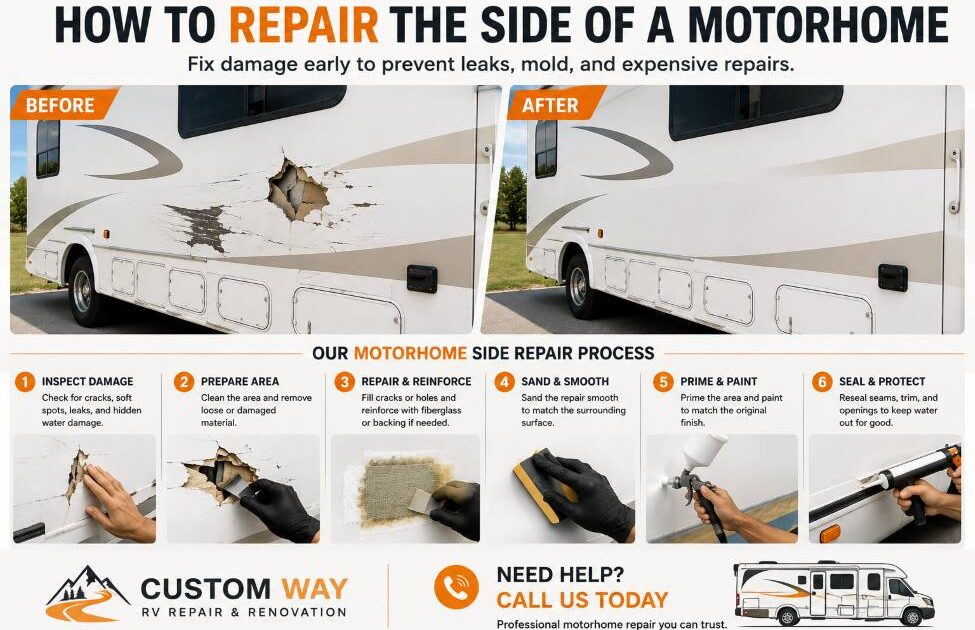
- Cleaning the damaged area
- Sanding loose material
- Reinforcing cracks if needed
- Applying fiberglass resin or compatible filler
- Sanding the repair smooth
- Priming and painting
- Blending the finish
Larger fiberglass damage may require panel repair, deeper reinforcement, or replacement of damaged backing material.
If the sidewall feels soft, wavy, or hollow, this may not be a simple fiberglass repair. It may be delamination or hidden water damage.
Custom way can inspect the sidewall and recommend the right repair instead of simply hiding the damage with filler.
What Is Motorhome Sidewall Delamination?
Delamination happens when the outer fiberglass skin separates from the inner wall structure. It can look like a bubble, wave, raised area, soft spot, or uneven section on the side of the motorhome.
Common causes include:
- Water leaks
- Failed sealant
- Window leaks
- Roof edge leaks
- Bad sidewall bonding
- Long-term moisture
- Heat and age
- Previous poor repairs
Delamination is serious because the wall layers are no longer bonded correctly. Applying paint or filler on the outside will not solve the real issue.
If you see bubbles, soft areas, or wavy fiberglass, call Custom way before the damage gets worse.
Aluminum Side Panel Damage
Some motorhomes and campers use aluminum siding or metal exterior panels. These can dent, crease, loosen, or separate at seams.
Small dents may be mostly cosmetic, but damaged seams or loose panels can allow water inside.
Aluminum side repairs may include:
- Panel inspection
- Fastener repair
- Trim resealing
- Dent repair
- Panel replacement
- Sealant work
- Checking for hidden moisture behind the panel
The important part is not just making the exterior look better. The repair must prevent future leaks.
Check Windows, Trim, and Seams
Side damage often starts around openings and edges.
Important areas to inspect include:
- Windows
- Entry door frame
- Storage compartment doors
- Slide-out openings
- Exterior lights
- Utility hookups
- Awning mounts
- Roof-to-wall seam
- Corner trim
- Beltline trim
- Ladder mounts
- Exterior vents
If sealant has cracked or separated, water can enter behind the wall. Over time, that can damage the side panel, insulation, framing, flooring, cabinets, and interior wall panels.
Custom way can check these areas, reseal problem spots, and repair the damage before it spreads.
Side Damage Can Lead to Interior Problems
The outside damage may be only the beginning.
When water enters the sidewall, it can cause problems inside the RV, including:
- Soft flooring
- Mold smell
- Wall stains
- Loose cabinets
- Damaged insulation
- Electrical issues
- Rotten wood backing
- Warped interior panels
- Bad odor
- Rusted hardware
- Weak mounting points
This is why motorhome side repair should be treated as an RV system problem, not just an exterior cosmetic job.
If the exterior side was damaged by water, the interior may also need repair.
Can You Repair the Side of a Motorhome Yourself?
Small scratches or minor cosmetic chips may be possible for a careful owner to handle. But larger sidewall damage is not a good place to guess.
DIY repair becomes risky when there is:
- Deep fiberglass cracking
- A hole through the sidewall
- Delamination
- Soft wall material
- Water damage
- Damage around a window or door
- Loose exterior trim
- Electrical wiring near the damaged area
- Slide-out related damage
- Large paint or finish area
A wrong repair can trap moisture, fail during travel, or make the final professional repair more difficult.
If the damage is more than a small surface scratch, call Custom way and let us inspect it.
Why Professional Motorhome Side Repair Is Worth It
A motorhome sidewall has to handle vibration, wind, rain, sun, road movement, and body flex. A repair that works on a house wall or car panel may not be right for an RV.
Professional repair helps make sure:
- The leak source is found
- Damaged material is not hidden
- The correct sealant is used
- The panel is repaired correctly
- The wall remains weather resistant
- The finish is cleaner
- Related interior damage is checked
- The repair is safer for travel
The goal is not only to make the side look better. The goal is to protect the motorhome.
Custom way Can Help With Motorhome Side Repair
If the side of your motorhome is damaged, Custom way can help inspect, repair, and restore the affected area.
We can help with:
- Motorhome sidewall repair
- RV fiberglass repair
- Exterior crack repair
- Impact damage repair
- Delamination inspection
- Leak detection
- Trim and seam resealing
- Window and door leak repair
- Storage compartment repair
- Exterior panel repair
- Soft floor repair
- Interior wall repair
- Flooring replacement
- Custom cabinet repair
- Electrical inspection near damaged areas
- Full RV renovation and upgrades
Motorhome damage is often connected. A sidewall leak can affect the floor. A damaged window seal can affect cabinets. A loose trim piece can cause hidden water damage. Our team can look at the full picture and recommend the right solution.
When You Should Call Custom way
You should contact Custom way if you notice:
- A crack in the side of your motorhome
- A hole or puncture in the exterior wall
- Soft or wavy fiberglass
- Water stains inside
- Mold or musty smell
- Loose trim
- Leaking window
- Damaged compartment door
- Sidewall bubbling
- Paint or gelcoat damage
- Soft flooring near the wall
- Any damage after impact or storm
Even if the damage looks small, it is better to check it early. RV water damage usually becomes more expensive with time.
Do Not Wait Until the Damage Spreads
Motorhome side damage can look harmless at first. A small crack, open seam, or loose trim piece may not seem urgent. But once water enters the wall, the repair can become much bigger.
Early repair can help prevent:
- Delamination
- Rotten wall structure
- Soft floors
- Mold
- Cabinet damage
- Electrical problems
- Expensive interior repairs
- Lower resale value
Calling Custom way early can save time, money, and stress.
To repair the side of a motorhome, first identify the type of damage. Do not simply cover it with random sealant or filler. Check for cracks, soft spots, delamination, water leaks, loose trim, and interior damage. Small cosmetic issues may be simple, but deeper sidewall damage needs proper repair.
If you want the repair done correctly, contact Custom way. We can inspect the damage, find the cause, repair the exterior, check for hidden water issues, and help with related RV services such as flooring, cabinets, electrical work, plumbing, roof repair, doors, and full renovation.
A clean motorhome side repair is not just about appearance. It is about protecting your RV for the road ahead.