
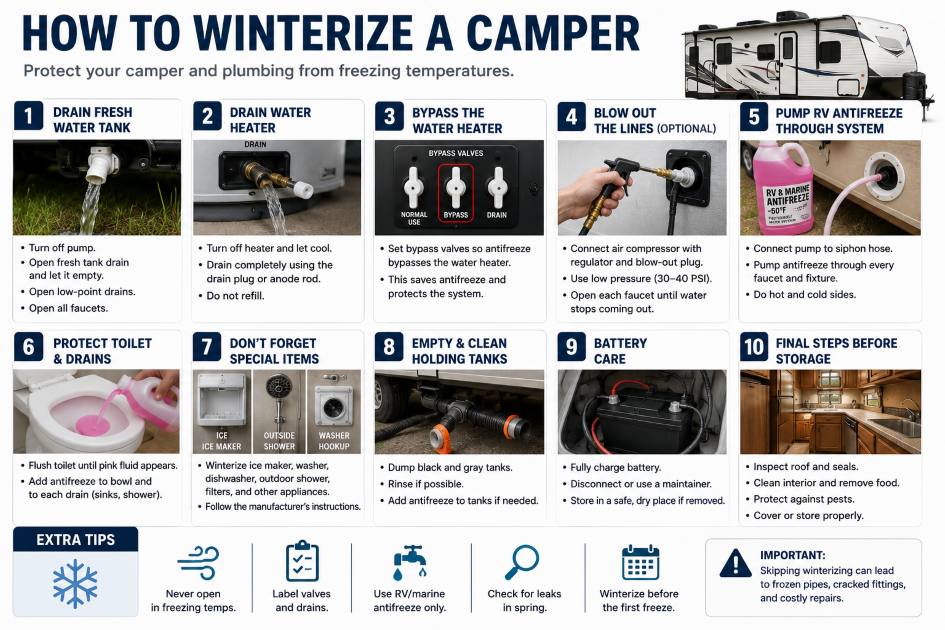
How to Winterize a Camper
Winterizing a camper means protecting the water system, plumbing, tanks, batteries, roof, seals, appliances, and interior before freezing weather or long storage. If water is left inside the lines, pump, faucets, toilet valve, shower, or water heater, it can freeze, expand, and crack parts that are expensive to replace.
The main goal is simple: remove water from places where it can freeze, protect the plumbing with RV antifreeze if needed, and prepare the camper so it stays dry, safe, and ready for the next season.
Why Winterizing a Camper Matters
A camper has many small plumbing parts hidden inside walls, cabinets, floors, and storage compartments. Even a small amount of trapped water can cause damage.
Freezing water can damage:
- Water pump
- Faucets
- Shower faucet
- Toilet valve
- PEX fittings
- Water heater
- Outdoor shower
- Low-point drains
- Fresh water tank fittings
- City water inlet
- Ice maker line
- Washer line, if equipped
A cracked fitting can turn into a leak when spring arrives. That leak can damage flooring, cabinets, insulation, and wall panels.
When Should You Winterize a Camper?
Winterize your camper before temperatures drop below freezing, especially if the camper will sit unused.
Do not wait for the first hard freeze.
You should winterize if:
- Night temperatures may fall below 32°F
- The camper will be stored for winter
- You will not use the water system for a long time
- The camper is parked outside
- You are traveling into cold areas
- The RV has already been drained but not protected
If you live in a mild climate but travel through cold states, winterizing may still be necessary.
Two Common Winterizing Methods
There are two main ways to winterize a camper water system.
Method 1: RV Antifreeze Method
This method pumps RV-safe antifreeze through the plumbing lines after draining the water system.
It is popular because it gives strong protection for winter storage.
Important: use only RV/marine antifreeze made for potable water systems. Never use automotive antifreeze in a camper water system.
Method 2: Blow-Out Method
This method uses compressed air to blow water out of the plumbing lines.
It can work well when done correctly, but pressure must be controlled. Too much air pressure can damage fittings, valves, and fixtures.
Many owners use both methods: blow out the lines first, then run RV antifreeze through the system for extra protection.
Supplies You May Need
Before starting, prepare:
- RV/marine antifreeze
- Water heater bypass kit, if not already installed
- Water pump converter kit or siphon hose
- Air compressor with regulator, if using blow-out method
- Blow-out plug for city water inlet
- Basic hand tools
- Towels
- Bucket
- Owner’s manual
- Gloves
- Flashlight
Most campers need several gallons of RV antifreeze, but the exact amount depends on plumbing layout and tank setup.
Step 1: Drain the Fresh Water Tank
Turn off the water pump.
Open the fresh water tank drain and let the tank empty completely.
If the camper has low-point drains, open those too. These are usually hot and cold drain points located under the camper or inside a service area.
Open the faucets while draining to help air enter the system.
Step 2: Drain the Water Heater
Turn off the water heater and let it cool completely before draining.
Make sure electric heating mode and propane mode are off.
Then drain the water heater according to the manufacturer’s design. Many RV water heaters use a drain plug or anode rod.
Be careful: hot water can cause burns, and pressure may still be inside the tank.
After draining, do not refill the water heater with RV antifreeze unless your specific setup requires it. In most camper winterizing procedures, the water heater is bypassed.
Step 3: Bypass the Water Heater
The water heater usually holds several gallons. Filling it with antifreeze wastes antifreeze and is usually unnecessary.
Use the bypass valves so antifreeze goes through the plumbing lines but does not fill the water heater tank.
Typical bypass setups may have one, two, or three valves.
Make sure the valves are set correctly before pumping antifreeze. If they are wrong, you may waste antifreeze or leave part of the system unprotected.
Step 4: Open Faucets and Drain Pressure
Open all faucets to release pressure and drain remaining water.
Do this for:
- Kitchen faucet
- Bathroom sink
- Shower
- Toilet
- Outdoor shower
- Low-point drains
- Any extra water outlet
Run both hot and cold sides.
Do not forget the outside shower. It is one of the most commonly missed winterizing points.
Step 5: Blow Out the Lines, Optional but Useful
If you choose to use compressed air, connect a blow-out plug to the city water inlet.
Use low pressure with a regulator. Do not blast high-pressure air into the RV plumbing system.
Open one faucet at a time until water stops spraying and mostly air comes out. Do both hot and cold lines.
Repeat for every fixture.
This step helps remove most of the water before antifreeze is added.
Step 6: Pump RV Antifreeze Through the System
Connect the water pump to a siphon hose or winterizing inlet so it pulls antifreeze directly from the bottle.
Turn on the water pump.
Open each fixture one at a time until pink antifreeze comes out.
Do this for:
- Kitchen cold side
- Kitchen hot side
- Bathroom sink cold side
- Bathroom sink hot side
- Shower cold side
- Shower hot side
- Toilet
- Outdoor shower cold side
- Outdoor shower hot side
- Any washer hookup or extra faucet
Close each fixture after antifreeze appears.
Step 7: Protect the Toilet and Drains
Flush the toilet until antifreeze appears in the bowl.
Leave a small amount of RV antifreeze in the toilet bowl to protect the seal from drying out.
Pour some RV antifreeze into each drain:
- Kitchen sink
- Bathroom sink
- Shower drain
- Toilet bowl
This protects P-traps and drain areas from freezing.
Step 8: Do Not Forget Special Appliances
Some campers have extra equipment that needs special winterizing.
Check for:
- Ice maker
- Dishwasher
- Washing machine
- Tankless water heater
- Water filtration system
- Refrigerator water line
- Black tank flush
- Outdoor kitchen faucet
- Spray port
- Water softener
- Instant hot water system
These items often have specific instructions. If you are not sure, check the owner’s manual or get professional help.
Step 9: Remove or Bypass Water Filters
Remove water filter cartridges before winterizing.
Filters can hold water and may be damaged by freezing or antifreeze. If your camper has an inline filter, under-sink filter, whole-RV filter, or refrigerator filter, remove or bypass it if possible.
Install a bypass plug if the system requires one.
Step 10: Empty and Clean Holding Tanks
Before storage, empty the black and gray tanks properly.
Then rinse if possible.
Do not leave waste sitting in the tanks all winter.
After draining, some owners add a small amount of RV antifreeze into the tanks through drains and toilet to protect valves and seals.
Step 11: Prepare the Battery
Battery care depends on battery type and storage conditions.
Basic battery storage steps:
- Fully charge the battery
- Disconnect it if appropriate
- Store it in a safe dry place if removed
- Keep terminals clean
- Use a proper maintainer if needed
- Protect from deep discharge
Lead-acid batteries can be damaged if left discharged in cold weather. Lithium batteries have different storage requirements and should be handled according to their battery management system and manufacturer guidance.
Step 12: Inspect Roof and Seals Before Storage
Winterizing is not only about plumbing.
Before storing the camper, inspect:
- Roof seams
- Roof vents
- Skylights
- Windows
- Entry door
- Storage compartment doors
- Slide-out seals
- Clearance lights
- Exterior trim
- Awning mounts
Water leaks during winter storage can cause serious damage by spring.
If sealant is cracked or separated, repair it before storage.
Step 13: Clean and Dry the Interior
Moisture and leftover food create problems.
Before storage:
- Remove all food
- Clean refrigerator and leave door slightly open
- Clean cabinets
- Remove trash
- Dry sinks and shower
- Wash bedding if needed
- Use moisture absorbers if appropriate
- Keep airflow in mind
- Check for pests
A camper stored dirty or damp can develop odor, mold, insects, or rodent problems.
Step 14: Protect Against Pests
Rodents can damage wiring, insulation, cabinets, and stored items.
Check and seal obvious entry points around:
- Utility openings
- Underbelly gaps
- Pipe penetrations
- Storage compartments
- Slide-out areas
- Vents
- Door gaps
Do not leave food, pet food, paper towels, or soft nesting materials inside if pests are a concern.
Step 15: Cover or Store the Camper Properly
If the camper is stored outside, think about weather protection.
A breathable RV cover can help, but it must fit correctly. A poor cover can rub the exterior, trap moisture, or damage vents and roof accessories.
Also consider:
- Tire covers
- Proper tire pressure
- Level storage position
- Battery maintenance
- Ventilation
- Snow load
- Periodic inspections during winter
Do not park where water pools under the camper for months.
Common Winterizing Mistakes
Avoid these mistakes:
- Waiting until after the first freeze
- Forgetting the outdoor shower
- Forgetting low-point drains
- Not bypassing the water heater
- Using automotive antifreeze
- Leaving water filters installed
- Using too much air pressure
- Missing the toilet valve
- Forgetting black tank flush
- Not draining the water heater
- Leaving food inside
- Ignoring roof leaks before storage
Most winter damage happens because one small part of the system was missed.
Can You Winterize a Camper Yourself?
Yes, many camper owners can winterize their RV themselves if the system is simple and accessible.
DIY winterizing is reasonable if:
- You understand your water system
- Valves are labeled
- Water heater bypass is clear
- You know where low-point drains are
- No special appliances are connected
- You have the right tools and antifreeze
Professional help is better if the camper has a complex plumbing system, washer, ice maker, tankless water heater, hidden valves, previous modifications, or existing leaks.
Custom way Can Help Winterize Your Camper
At Custom way, we help RV and camper owners prepare their vehicles for storage, cold weather, and future travel.
We can help with:
- Camper winterizing
- Water system draining
- RV antifreeze service
- Water heater bypass setup
- Plumbing inspection
- Leak detection
- Water pump service
- Faucet and shower service
- Toilet service
- Battery and charging system checks
- Roof and seal inspection
- Interior repairs
- Flooring, cabinets, electrical, roof, plumbing, and many other RV services
Winterizing is a good time to inspect the whole camper. Small leaks, weak seals, old plumbing fittings, and battery issues are easier to fix before they become expensive spring repairs.
To winterize a camper, drain the fresh water system, empty the water heater, bypass the water heater, clear the plumbing lines, pump RV-safe antifreeze through each faucet and outlet, protect the drains and toilet, prepare the batteries, inspect seals, clean the interior, and protect the camper during storage.
The key is not rushing. One missed valve or forgotten outdoor shower can cause freeze damage.
A properly winterized camper is easier to reopen in spring and much less likely to surprise you with leaks, cracked fittings, or water damage.