
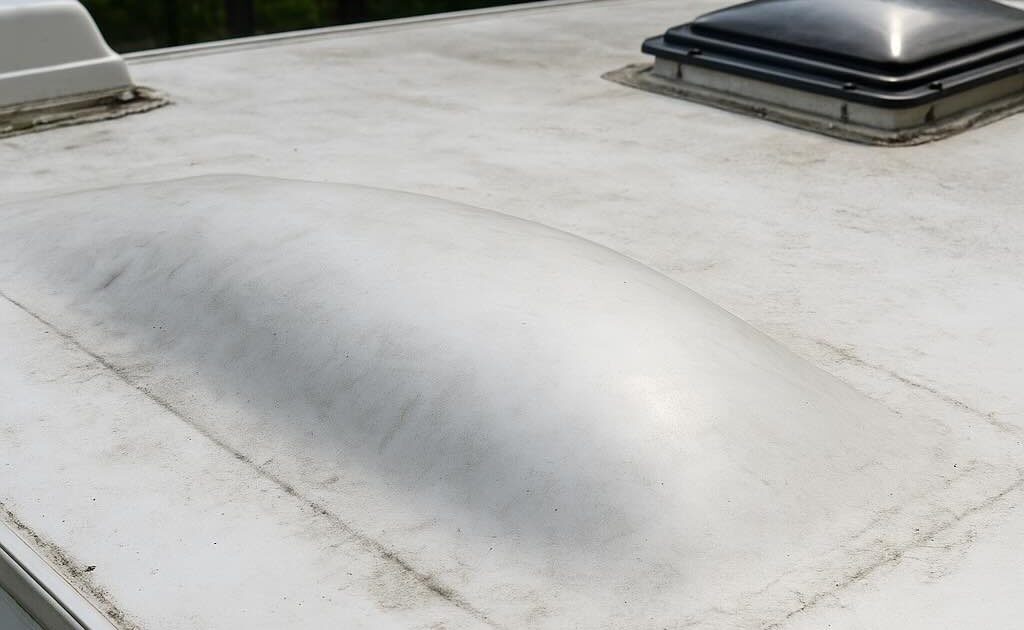
🧐 What Is an RV Roof Bubble?
An RV roof bubble is a raised, swollen area on your RV’s roof—usually found on rubber membranes like EPDM or TPO. It can range in size from a few inches to several feet and may feel soft or air-filled when pressed.
It’s not just a cosmetic issue. A bubble in your RV roof is often a warning sign of improper adhesion, trapped air, or even water damage beneath the roofing membrane.
🛻 Why You Might See an RV Roof Bubble While Driving
If you’ve noticed a roof bubble forming while driving, it’s likely due to:
-
Wind pressure getting under a poorly adhered membrane
-
Heat expansion as your roof heats up at highway speeds
-
Existing delamination that gets worse with movement
This is especially common on older RVs or roofs that were poorly installed or repaired.
Important: A roof bubble that lifts or flaps while driving can eventually tear, leading to major leaks and expensive damage.
🔍 Common Causes of RV Roof Bubbles
-
Bad Adhesive or Application – The membrane wasn’t fully glued during installation or repair.
-
Heat and Expansion – Hot weather causes the rubber to expand, creating blisters.
-
Moisture Under the Roof – Trapped water or humidity under the membrane causes swelling.
-
Age and Wear – Older roofs naturally lose adhesion and begin to bubble or delaminate.
🔧 How to Fix Bubble in RV Roof: Step-by-Step
If you’re wondering how to fix a bubble on your RV roof, the method depends on whether it’s a dry bubble (air only) or a wet bubble (with moisture inside).
✅ Small Air Bubbles (No Moisture)
These are mostly cosmetic but still need attention if they grow over time.
Steps:
-
Clean the roof area with RV roof cleaner.
-
Press the bubble down gently.
-
Apply a heat gun briefly (low setting) to help the rubber shrink slightly.
-
Use RV roof sealant (lap sealant or silicone) around the bubble’s edges to prevent air intrusion.
⚠️ Large or Moisture-Filled Bubbles
These must be opened and resealed properly.
Steps:
-
Cut open the bubble carefully with a utility knife.
-
Check for mold, wet insulation, or rot—dry out the area completely.
-
Clean and scrape off old adhesive.
-
Re-glue the membrane using EPDM or TPO-approved adhesive.
-
Apply a patch or use a specialized RV roof bubble repair kit.
-
Seal the repair with lap sealant or RV silicone roof coating.
🧰 Recommended RV Roof Bubble Repair Kit
If you’re not comfortable cutting and gluing, a roof bubble repair kit can save time. Look for:
-
EPDM or TPO compatibility
-
Self-adhesive patches
-
Seam rollers
-
Lap sealant
Popular kits: Dicor Rubber Roof Repair Kit, Eternabond RoofSeal, or Camco Roof Patch Tape.
🛡️ RV Rubber Roof Bubble Repair: Prevention Tips
-
Check your roof at least every 90 days.
-
Re-seal seams, vents, and skylights yearly.
-
Use high-quality self-leveling RV silicone or lap sealant.
-
Park in shade or under a cover to reduce heat damage.
-
After major rain, inspect for signs of swelling or bubbles.
A bubble in your RV roof might seem harmless at first, but it can grow into a serious issue if ignored. Whether you’re dealing with a roof bubble while driving or a minor air pocket from poor installation, addressing the problem early helps protect your investment.