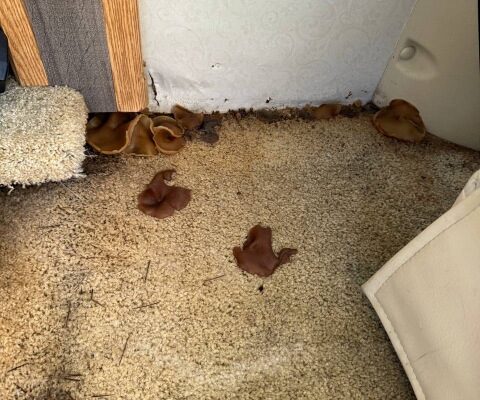
RV Water Damage Repair

At Custom-way, we understand how crucial it is to maintain your RV in top condition. Water damage can be a serious issue, but our expert team is here to help with comprehensive RV water damage repair services. Whether it’s your walls, ceiling, slide-outs, or floors, we’ve got you covered.

RV Water Damage Repair Costs

Understanding the costs associated with RV water damage repair is essential. The cost can vary depending on the extent of the damage and the specific area affected. Our team provides detailed estimates and works with you to find the most cost-effective solutions.

How to Repair RV Wall Water Damage

Repairing water damage in RV walls involves several steps:

  1. Inspection: We thoroughly inspect the affected area to assess the damage.
  2. Drying: The damaged area is dried to prevent mold growth.
  3. Repair: We replace or repair the damaged sections of the wall.
  4. Sealing: Finally, we seal the area to prevent future water intrusion.

How to Repair Water Damage in RV Ceiling

Ceiling water damage can be tricky, but our team follows a meticulous process:

  1. Assessment: We identify the source of the leak and the extent of the damage.
  2. Drying and Cleaning: The ceiling is dried and cleaned to remove any mold or mildew.
  3. Repair and Replacement: Damaged ceiling panels are repaired or replaced.
  4. Sealing and Finishing: We seal the area and ensure a seamless finish.

RV Slide Out Water Damage Repair Cost

Slide-outs are particularly vulnerable to water damage. Repair costs can vary, but we strive to provide affordable and effective solutions. Our team will give you a detailed estimate after a thorough inspection.

RV Water Damage Repair Near Me

Located in Orange County, USA, we are your local experts for RV water damage repair. Our convenient location and prompt service make us the go-to choice for RV owners in the area.

RV Floor Water Damage Repair

Floor water damage can compromise the structural integrity of your RV. Our repair process includes:

  1. Inspection and Assessment: We check the extent of the damage.
  2. Drying and Cleaning: The floor is dried and cleaned to prevent mold.
  3. Repair and Replacement: Damaged flooring is repaired or replaced.
  4. Sealing and Protection: We seal the area to protect against future damage.
before RV Water Damage Repair-1

Contact us today and get a motorhome detailing on the same day

+1 (840) 205-7314

Camper Water Damage Repair in Orange County

Why Choose Our Water Damage Repair Services?

    • Expertise and Experience:

Our skilled technicians have years of experience in diagnosing and repairing all types of RV water damage.

    • Comprehensive Services:

From minor leaks to major water damage, we handle it all with precision and care.

    • Quality Materials:

We use only the best materials to ensure long-lasting repairs.

Get your RV ready for your next adventure or the profitable sale – contact us

    Repairing RV wall water damage involves several key steps to ensure the integrity and appearance of your RV. Here’s a concise guide:

    1. Inspection: Begin by thoroughly inspecting the affected area to assess the extent of the damage. Look for signs of mold, mildew, and structural issues.
    2. Drying: Use fans, dehumidifiers, or heaters to dry out the damaged area completely. This step is crucial to prevent mold growth and further damage.
    3. Removal: Carefully remove any damaged wall panels or materials. Be sure to wear protective gear to avoid exposure to mold or other harmful substances.
    4. Repair: Replace the damaged sections with new materials. This may involve cutting new wall panels to size and securing them in place.
    5. Sealing: Apply a waterproof sealant to the repaired area to prevent future water intrusion. Ensure all seams and edges are properly sealed.
    6. Finishing: Once the repair is complete, finish the wall to match the rest of your RV’s interior. This may include painting, wallpapering, or applying other finishes.

    By following these steps, you can effectively repair water damage in your RV walls and restore your vehicle to its original condition. If you’re unsure about any part of the process, consider consulting a professional for assistance.

    Repairing water damage in your RV ceiling involves a few critical steps to ensure a thorough and lasting fix. Here’s a concise guide:

    1. Assessment: Start by identifying the source of the leak and the extent of the damage. This will help you determine the necessary repairs and prevent future issues.
    2. Drying and Cleaning: Use fans, heaters, or dehumidifiers to dry out the affected area completely. Clean the area to remove any mold or mildew that may have developed.
    3. Removal: Carefully remove any damaged ceiling panels or materials. Be cautious of electrical wiring and other components that may be hidden behind the ceiling.
    4. Repair and Replacement: Replace the damaged sections with new materials. This may involve cutting new ceiling panels to size and securing them in place. Ensure that any insulation is also replaced if it was affected by the water damage.
    5. Sealing and Finishing: Apply a waterproof sealant to the repaired area to prevent future leaks. Finish the ceiling to match the rest of your RV’s interior, whether that involves painting, applying wallpaper, or other finishes.

    By following these steps, you can effectively repair water damage in your RV ceiling and restore it to its original condition. If you’re unsure about any part of the process, consider consulting a professional for assistance.

    The cost to repair water damage in a camper can vary widely depending on several factors, including the extent of the damage, the specific area affected, and whether you choose to do the repairs yourself or hire a professional. Here’s a general breakdown:

    • Minor Repairs: Simple fixes like resealing windows or tightening gaskets
    • Moderate Repairs: Repairing water damage to walls or ceilings
    • Major Repairs: Extensive damage, such as replacing subfloors or addressing significant structural issues

    It’s important to get a detailed estimate from a trusted repair service to understand the full scope and cost of the repairs needed.

    If you have any more questions or need further assistance, feel free to ask!

    An RV is typically considered “totaled” when the cost of repairs exceeds its actual cash value (ACV). This threshold can vary depending on the age, make, model, and overall condition of the RV. Here are some key points to consider:

    1. Extent of Damage: Severe water damage affecting multiple areas such as the floor, walls, ceiling, and slide-outs can significantly increase repair costs. If the structural integrity is compromised, it may lead to a total loss.
    2. Repair Costs: Repair costs for extensive water damage can range from $2,000 to $5,000 or more, depending on the severity and the specific repairs needed. If these costs approach or exceed the RV’s value, it may be considered totaled.
    3. Insurance Assessment: Insurance companies will assess the damage and compare repair costs to the RV’s ACV. If repairs are deemed too costly relative to the RV’s value, they may declare it a total loss.
    4. Market Value: The market value of the RV plays a crucial role. Older RVs with lower market values are more likely to be totaled with less extensive damage compared to newer, higher-value models.

    If you suspect your RV has significant water damage, it’s essential to get a professional assessment and consult with your insurance provider to understand your options.