How to Install a Power Inverter in a Camper Trailer
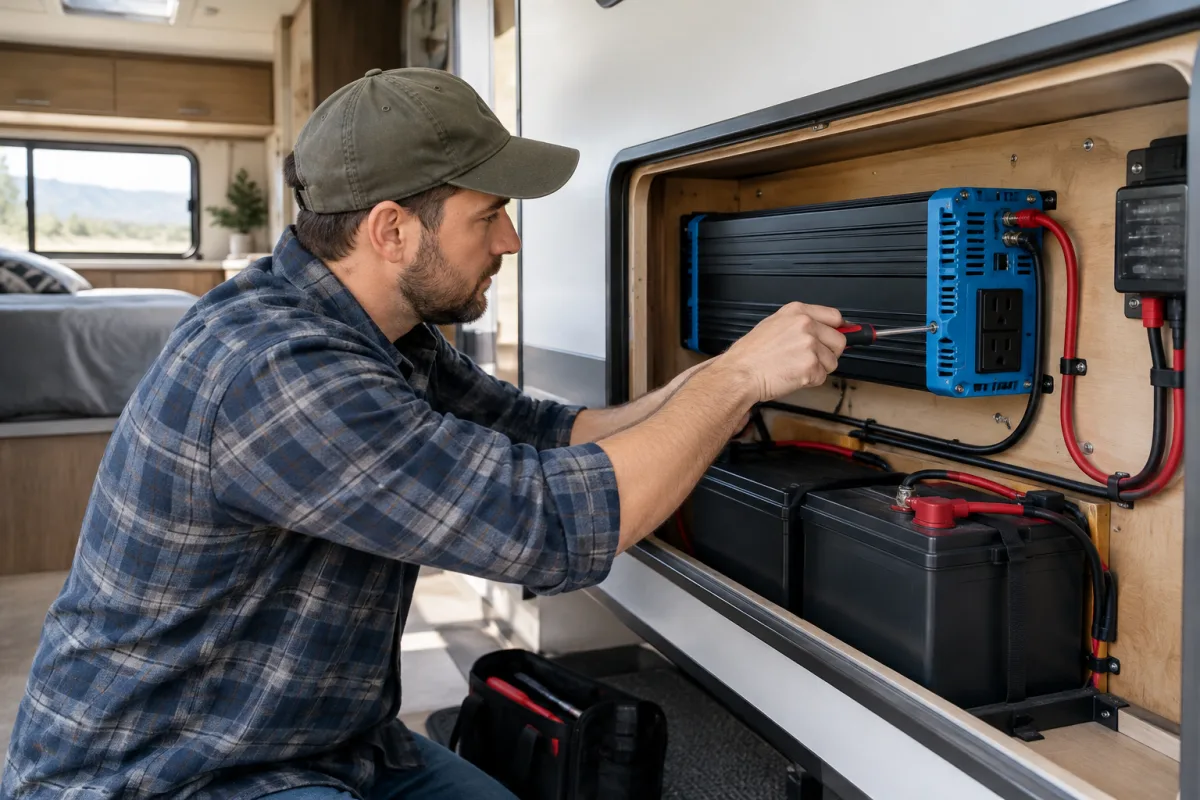
Installing a power inverter in a camper trailer requires careful planning because the system combines high-current DC wiring with AC power. The basic installation includes choosing an inverter for the appliances you need to run, mounting it in a dry and ventilated location, connecting it to the battery through correctly sized cables and overcurrent protection, and grounding the metal chassis.
For complex RV electrical work, Custom way repairs and renovates RVs and camper vans in California, including electrical repair and solar installation. The company serves Orange County, Los Angeles and Riverside County from 17223 Roseton Ave, Artesia 90701. For installation or repair assistance, call +1 840-205-7314 or email customway.ca@gmail.com.
1. Choose the right inverter
Start by listing every appliance you plan to power. Record both its normal running wattage and its startup or surge demand. Motors in refrigerators, air conditioners, pumps and some tools can briefly require much more power than their running rating.
Do not select an inverter from wattage alone. The required cable size and fuse rating also depend on system voltage, maximum continuous and surge current, cable length, acceptable voltage drop, battery type and the inverter manufacturer’s installation table.
For example, a 2,000-watt inverter on a 12-volt system can draw roughly 167 amps at ideal full-load efficiency, before conversion losses. That requires short, heavy-duty cables, secure terminals and properly rated DC protection.
2. Select a suitable installation location
Mount the inverter close enough to the battery to keep the high-current DC cables short, while leaving enough space for cooling and service access. The location should be dry, clean and ventilated.
- Do not mount the inverter directly above batteries.
- Keep it away from battery fumes and possible electrolyte exposure.
- Protect it from water leaks, condensation and excessive heat.
- Secure it to a solid surface using the mounting points specified by the manufacturer.
Product lines such as Victron Energy Inverter Smart include manufacturer guidance for battery cables, external fuses, battery capacity, chassis grounding and neutral configuration. The specific instructions for the model you install take priority over general wiring advice.
3. Disconnect every power source
Before working on the trailer, disconnect shore power, turn off the generator and switch off the battery disconnect. Make sure the inverter cannot receive power from any source. Verify that the AC circuits are de-energized before removing covers or wiring outlets.
4. Install the DC cables and fuse
Run a positive cable from the battery to the inverter and a negative cable from the battery to the inverter. Keep both cables as short as practical and route them so they cannot rub against sharp metal edges or become damaged by moving equipment.
Install a fuse or DC circuit breaker in the positive battery cable close to the battery. Its rating must match the inverter manufacturer’s specifications and the allowable ampacity of the cable. The fuse protects the cable and helps limit the consequences of a short circuit; it is not selected only from the inverter’s wattage.
- Confirm the inverter’s required cable gauge and maximum fuse rating.
- Install the positive fuse or breaker near the battery.
- Use correctly rated lugs, terminals and insulation.
- Connect positive and negative cables with the correct polarity.
- Tighten terminals according to the inverter manual.
- Cover exposed positive connections to prevent accidental shorts.
Use insulated tools and check polarity before energizing the system. Reverse battery polarity can damage the inverter.
5. Ground the inverter chassis
Connect the inverter’s metal chassis to the camper trailer’s grounding system. Use a conductor sized according to the manufacturer’s instructions and the electrical requirements applicable to the installation. The grounding conductor must be capable of carrying the relevant fault current.
Chassis grounding is separate from the negative battery cable and should not be omitted. The inverter manual should specify the grounding terminal and the required conductor size.
6. Connect the AC output safely
A standalone inverter can power selected appliances through its built-in receptacles or a dedicated outlet. This is the simplest arrangement because it avoids modifying the trailer’s existing AC distribution.
Connecting the inverter to the camper trailer’s existing outlets requires a properly designed AC installation. The inverter output must be isolated from shore power and generator power, with suitable breaker protection and correct neutral-to-ground configuration.
- Never connect an inverter output directly to shore power or an energized campground outlet.
- Use an approved transfer switch when the inverter supplies the trailer’s existing AC circuits.
- Ensure the AC wiring, breakers and receptacles are suitable for the system.
- Verify the neutral-to-ground arrangement required by the inverter and transfer-switch design.
- Use GFCI protection where required by the installation design and applicable rules.
The Progressive Dynamics PD1200 Series Inverter installation guide describes automatic transfer-switch arrangements for passing shore or generator power through to the RV. It also covers hard-wired output and GFCI-protected receptacle installations. The exact wiring depends on the trailer’s service configuration and the selected model.
7. Check the system before use
Inspect every connection before turning the battery disconnect back on. Confirm that the DC fuse or breaker is installed, the polarity is correct, the chassis ground is connected and the AC conductors are isolated from other power sources.
After energizing the system, test the inverter with a small load first. Check for unusual heat, loose connections, alarms, damaged insulation or voltage problems. Do not continue operating the system if a cable, terminal or protective device becomes excessively hot.
When professional installation is the safer choice
Professional help is strongly recommended when the inverter will supply the trailer’s complete AC system, when a transfer switch is required, or when the trailer includes shore power, a generator, solar charging and multiple battery banks. Cable gauges, fuse ratings, disconnects, grounding and neutral bonding must be matched to the actual equipment rather than guessed.
Custom way provides RV electrical repair and solar installation for campers and RVs in Orange County, Los Angeles and Riverside County. Visit the shop at 17223 Roseton Ave, Artesia 90701, or contact the team at +1 840-205-7314 or customway.ca@gmail.com to discuss an RV inverter installation or related electrical work.